In this example we two projects. project1 and project2
project1 has 2 classes : Example1 and Example2. It also has 1 unit test to fully cover Example1
project2 has only unit test. The unit test fully covers Example2 from project1
As project1 is not covering Example2, jacoco will report 0% coverage for Example2
Firstly, to show that JaCoCo will show 0% coverage for Example2 class in project1 run these commands:
mvn clean verify
then run
mvn jacoco:report
if you go into folder
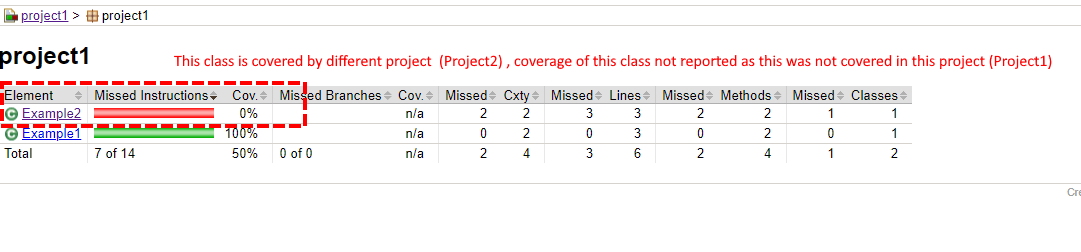
project1/target/site/jacoco/project1 you’ll the reports produced by jacoco
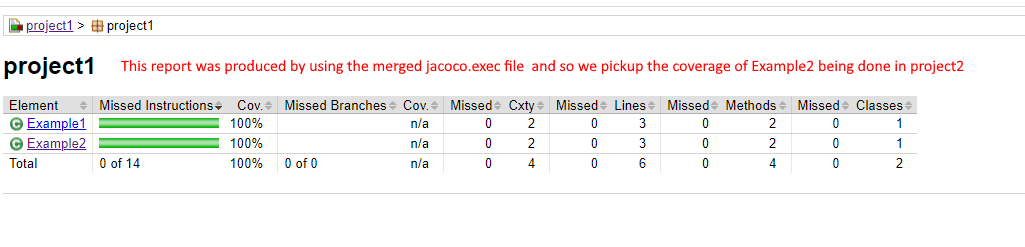
The report shows class Example1 has 100% coverage whilst Example2 (which is covered by project2) has 0% coverage
Using merge goal to get JaCoCo to report on coverage provided by other projects
For the above example, we want to show Example2 is fully covered (as coverage was provided by project2)
To get jacoco to report coverage provided by other projects. We need to merge all the jacoco.exec files we have
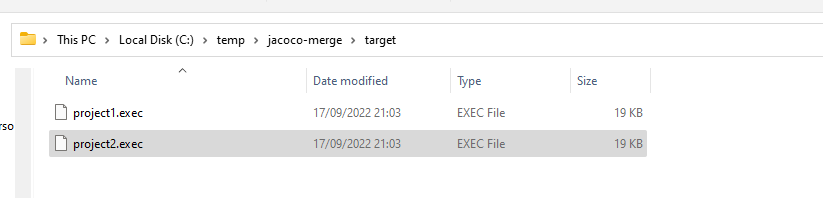
project1 jacoco exec is under project1/target/jacoco.exec
project2 jacoco exec is under project2/target/jacoco.exec
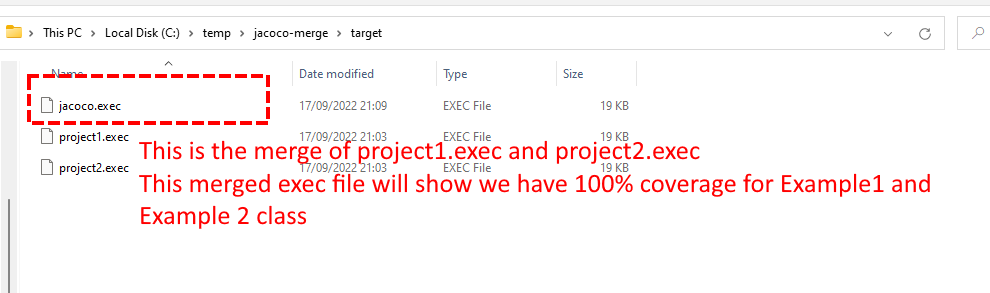
Merge the jacoco.exec from project 1 and project 2 to make a merged jacoco.exec The merged jacoco.exec file will show we have 100% coverage for Example2 class. We will then configure the reporting goal to use this merged exec file.
Step 1
We want to copy all the jacoco.exec file into the top level folder target folder (we may also need to create the target folder)
we need to copy all jacoco.exec we have into the top-level target folder, but so that they don’t overwrite each other, we need to give them unique names, for this we will use merge goal (or you can use copy script for this step)
End result should look like this (strictly speaking, you could use copy commands to achieve this instead)
Step 2
Now that we have all the exec files (project1.exec and project2.exec) in one folder, we need to merge these 2 files to produce merged jacoco.exec file
For this, we run this command. NOTE: Since all the files are all in the top level folder, we only need to execute merge goal at the top level folder only so we use flag -N to not recurse this merge goal in the child projects.
mvn -N jacoco:merge
Result of above
Step 3
Now that we have the merged exec file produced in above step. What we want to do is run the report goal (to generate the html reports) but instead the of using default jacoco.dataFile value (${project.build.directory}/jacoco.exec) we will configure jacoco.dataFile to instead use the merged jacoco exe file
I was looking into various options in dynamically creating a video in Java and came across xuggler, it’s really cool and it works works nicely in a maven project. The recent updates to the library means you don’t have to install the binaries before you run your Java program.
I had to use this repository below to pull down the artifact as it wasn’t hosted on Maven Central.
(3) In the how to for sonar, they advice you use mysql as the database – which is a good advice, but if you just want to use the derby database provided out of the box, the derby database is good enough.
Useful tip to save you some time, I want to setup my sonar server on different host to where the build system is. If you also want to do this, then you need to go to the conf folder,
Edit the file: sonar.properties
and uncomment the line
# uncomment to accept connections from remote hosts. Ba default it only accepts localhost connections.
sonar.derby.drda.host: 0.0.0.0
by uncommenting the above line you allow clients on other boxes to connect to the derby database.
Next startup sonar by going to bin\windows-x86-32 (or the appropriate folder for the OS you are using) and run “StartSonar.bat” ( if you plan to run sonar as a service, it’s worthwhile running the InstallNTService.bat so that Sonar appears in your windows service list). If it’s the first time you starting sonar, you have to be a little patient as it creates the database under the data folder in sonar. To see what’s happening, can tail the log file under logs directory.
You should lots of activity in the sonar.log file and hopefully when sonar is up and running, you will see see lines appearing in your log.
2011.06.11 17:51:11 INFO org.sonar.INFO Register quality models…
2011.06.11 17:51:11 INFO org.sonar.INFO Register quality models done: 2 ms
2011.06.11 17:51:11 INFO org.sonar.INFO Start services done: 18139 ms
2011.06.11 17:51:11 INFO org.sonar.INFO Loading web services…
2011.06.11 17:51:11 INFO org.sonar.INFO Loading web services…
2011.06.11 17:51:12 INFO org.sonar.INFO Sonar started: http://0.0.0.0:9000/
That’s a good sign! 🙂 You should now be able to browse to the sonar page on port 9000 and see something like the following..
Congratulations you have sonar up and running!
Obviously not very exciting, in the next post, I will go through how to to do static analysis of an existing maven project using sonar. Stay tuned!