Using JaCoCo merge goal to report coverage in multi-module projects

This Example github project shows how jacoco:merge goal can be used to merge all the exec files

In this example we two projects.  project1 and project2

  • project1 has 2 classes : Example1 and Example2. It also has 1 unit test to fully cover Example1
  • project2 has only unit test. The unit test fully covers Example2 from project1

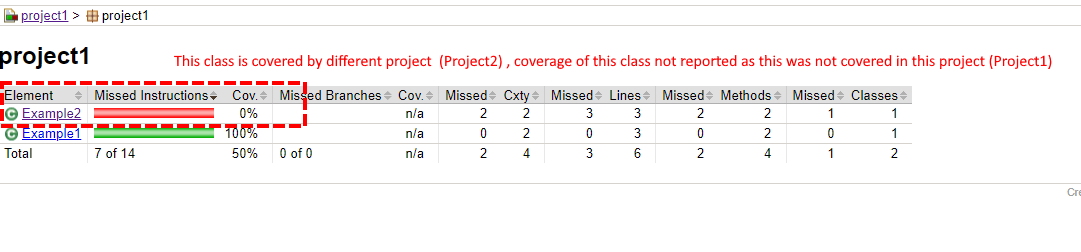
As project1 is not covering Example2, jacoco will report 0% coverage for Example2

Firstly, to show that JaCoCo will show 0% coverage for Example2 class in project1 run these commands:


mvn clean verify

then run


mvn jacoco:report

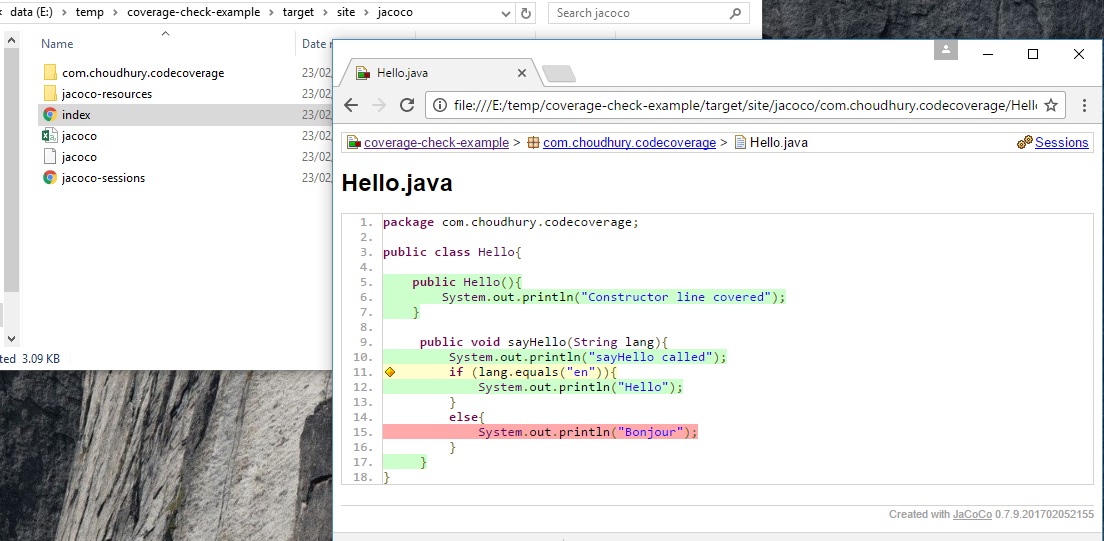
if you go into folder

project1/target/site/jacoco/project1 you’ll the reports produced by jacoco

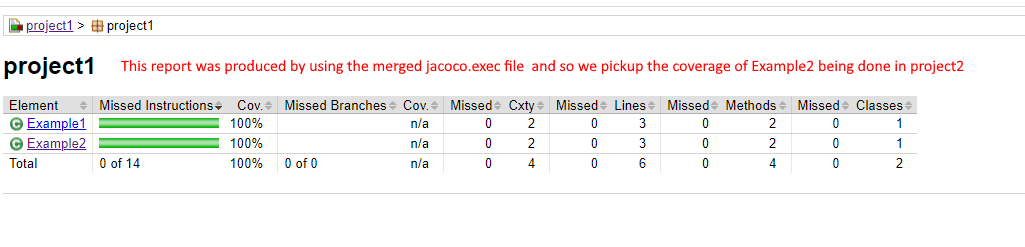
The report shows class Example1 has 100% coverage whilst Example2 (which is covered by project2) has 0% coverage

Using merge goal to get JaCoCo to report on coverage provided by other projects

For the above example, we want to show Example2 is fully covered (as coverage was provided by project2)

To get jacoco to report coverage provided by other projects. We need to merge all the jacoco.exec files we have

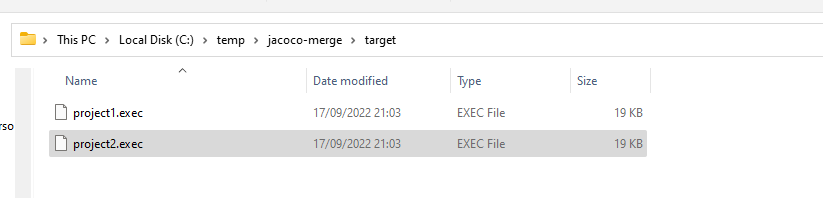
  • project1 jacoco exec is under project1/target/jacoco.exec
  • project2 jacoco exec is under project2/target/jacoco.exec

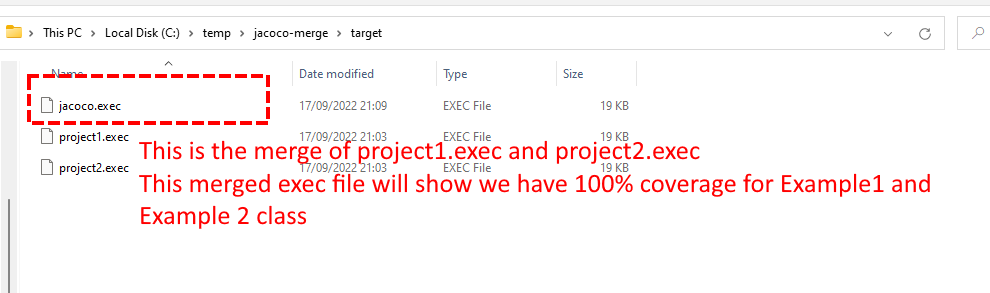
Merge the jacoco.exec from project 1 and project 2 to make a merged jacoco.exec The merged jacoco.exec file will show we have 100% coverage for Example2 class. We will then configure the reporting goal to use this merged exec file.

Step 1

We want to copy all the jacoco.exec file into the top level folder target folder (we may also need to create the target folder)

we need to copy all jacoco.exec we have into the top-level target folder, but so that they don’t overwrite each other, we need to give them unique names, for this we will use merge goal (or you can use copy script for this step)

Note: jacoco:merge goal requires fileSets config to be present see : merge goal documentation

We will add this to our the jacoco plugin configuration (so that we can use the merge goal)

<fileSets>
  <fileSet>
    <directory>${project.build.directory}</directory>
    <includes>
      <include>*.exec</include>
    </includes>
  </fileSet>
</fileSets>

as mentioned, the file(s) when written to the top level, we don’t want them to overwrite to each other, so we give them file name :  

${project.artifactId}.exec

E.g. on Windows if the project level folder was : c:/temp/jacoco-merge

You would run this (making sure that c:/temp/jacoco-merge/target) exists first


mvn jacoco:merge -Djacoco.destFile=c:/temp/jacoco-merge/target/${project.artifactId}.exec

End result should look like this (strictly speaking, you could use copy commands to achieve this instead)

Step 2

Now that we have all the exec files (project1.exec and project2.exec) in one folder, we need to merge these 2 files to produce merged jacoco.exec file

For this, we run this command. NOTE: Since all the files are all in the top level folder, we only need to execute merge goal at the top level folder only so we use flag -N to not recurse this merge goal in the child projects.


mvn -N jacoco:merge

Result of above

Step 3

Now that we have the merged exec file produced in above step. What we want to do is run the report goal (to generate the html reports) but instead the of using default jacoco.dataFile value (${project.build.directory}/jacoco.exec) we will configure jacoco.dataFile to instead use the merged jacoco exe file


mvn jacoco:report -Djacoco.dataFile=C:\temp\jacoco-merge\target\jacoco.exec

Now if we look again in project1/target/site/jacoco/project1 we can see it shows both Example1 and Example2 have 100% coverage

Maven Enforcer Plugin

The maven-enforcer-plugin (and it’s various extensions) are really useful if you want to enforce various build rules such as :

  • Make sure the maven build is using minimum required Java and Maven versions.
  • Build is not referring to snapshot dependencies
  • No Duplicate classes in your project dependencies (see screenshot below of what it reports when it finds duplicates)
  • Ban certain imports (e.g. java.util.Vector, java.util.Date etc) being used in your build.

Here is an example project to show above checks in action.

Output of BanDuplicateClasses check if it detects duplicate classes.

Output of RestrictImports if finds usage of Banned Import (example: java.util.Vector).

Enforcing Minimum Code Coverage

If you want to enforce minimum code coverage check, JaCoCo worked really in the projects that I’ve worked on so far.

JaCoCo works as agent (there is another option where it can do offline instrumentation). The prepare-agent goal sets up the “jacocoProperty” property to setup JaCoCo as agent on the the surefire argLine (so it will only work if sure-fire is configured to run your unit tests in forked process)

Here is basic maven project that demonstrates how to check minimum line and branch coverage of 80% is met.

Prepare Agent Goal

<plugin>
        <groupId>org.jacoco</groupId>
        <artifactId>jacoco-maven-plugin</artifactId>
        <version>0.8.2</version>
       
         <executions>

           <!--  (1)  Prepare agent runs in the init phase, it setups the jacocoProperty,  so we can insert this to the maven sure fire argLine and get to run jacoco as agent -->
          <execution>
            <id>prepare-agent</id>
            <goals>
              <goal>prepare-agent</goal>
            </goals>
            <configuration>
              <propertyName>jacocoArgLine</propertyName>
              <includes>
                <include>com.choudhury.codecoverage.*</include>
              </includes>
            </configuration>
          </execution>

SureFire Plugin Argline

We run sure fire and we add the “jacocoProperty” as part of the argLine

 <plugin>
        <groupId>org.apache.maven.plugins</groupId>
        <artifactId>maven-surefire-plugin</artifactId>
        <version>2.22.1</version>
        <configuration>
            <!-- (2)  setup the argLine and run the unit tests.   **NOTE the "jacocArgeLine" property was configured the "prepare-agent" goal of Jacoco  (see below) -->
            <argLine>${jacocoArgLine} -Xmx256m</argLine>
        </configuration>
      </plugin>

After the forked sure fire process is has completed it write the jacoco.exec file in the target file. This file is required for both the “check” and “report” JaCoCo goals.

jacoco_coverage_file

Check Goal
In verify phase, we execute the check goal of JaCoCo

          <!--  (3) the check goal by default runs in the verify phase, we want to fail the build if mimimum code coverage checks aren't met -->
          <execution>
            <id>check</id>
            <goals>
              <goal>check</goal>
            </goals>
            <configuration>
              <rules>
                <!-- All classes must have 80% line and branch coverage . Note we use 2 d.p so that we get can any check failure messages reported to 2 d.p  -->
                <rule >
                  <element>CLASS</element>
                  <limits>
                    <limit >
                      <counter>LINE</counter>
                      <value>COVEREDRATIO</value>
                      <minimum>0.80</minimum>
                    </limit>
                    <limit >
                      <counter>BRANCH</counter>
                      <value>COVEREDRATIO</value>
                      <minimum>0.80</minimum>
                    </limit>
                  </limits>
                  <excludes>
                    <exclude>com.choudhury.codecoverage.Bye</exclude>
                  </excludes>
                </rule>
              </rules>
            </configuration>
          </execution>
        </executions>

Example Project

Example maven project can be found here

With the example project, when we run “mvn clean install” we expect to fail on code coverage checks.

To confirm that Jacoco agent is correctly being appended to the Java argLine for maven SureFire plugin, temporarily put a long enough pause in the Unit Test (and whilst the Unit Test are running) launch jvisualvm to check that jacoco is correctly setup as an agent.

jacoco_run_as_agent

min_check_failed

If we update the HelloTest to test the missed branch and re-run “mvn clean install” we should see the lines “All Coverage checks have been met” to appear and the the build should pass 🙂

min_check_passed

JaCoCo Code Coverage Reports

Another nice feature of JaCoCo maven plugin is the report goal allowing you to see which lines have been covered by your tests.

Execute the report goal of the JaCoCo maven plugin

mvn jacoco:report

(Note : this reads the jacoco.exec file in your target folder, do make sure it’s present when you run this goal, otherwise you will get no reports produced).

The report goal should produce the html files under target/site/jacoco folder.

  • Green shows the covered lines
  • Yellow shows partially covered branches (you can hover over the diamond icon to get tooltip of how many branches covered)
  • Red is the missed lines.

Reporting Unit Test and Integration Test Coverage In Sonar

If you are familiar with sonar, then the standard setup of the sonar plugin in your maven project will report Unit test coverage using Cobertura.

Sonar can also report Integration Test coverage using Jacoco

http://www.sonarsource.org/measure-coverage-by-integration-tests-with-sonar-updated/

However to report Integration test coverage on Multi-module maven projects, you may need you to tweak your build

Lets take this example

Projects:
Parent
Project A (jar)
Project B (jar)
Project C (Webapp utilising A and B)

Now if you do

mvn clean install sonar:sonar

on the parent project

What happens is the following

clean, install sonar:sonar will get run on project A
clean, install sonar:sonar will get run on project B
clean, install sonar:sonar will get run on project C

This setup may work if you want to report Unit Test coverage, but if you want to report Integration test coverage (where your integration tests get run against the final assembled war built in project C). The above is running sonar analysis too early for project A and B – as its project C that is will run integration test and produce the IT dump file for sonar to analyse.

You will need redo you your build to a multi-step one,

Multi-Step Build

Step 1 , You run mvn clean on the parent project, to delete everying in the target folder (including any Jacoco dump from previous runs )

Step 2 you run mvn install on the parent project, to run your unit tests and integration tests and produce the single Integration Test Jacoco dump file.

Step 3 from the parent, you run mvn sonar:sonar

Why run multi-step, well, it’s so that when you run sonar:sonar in Step 3, when its comes to analysis project A, B, C, sonar can refer to the single jacoco IT dump file which was produced in Step 2.

Details about Step 2

In Step 2, when you run you Integration tests, its good idea to separate Unit Test and Integration Test. maven-sure-fire plugin to run your Unit Test and maven-fail-safe plugn to run your IT tests.

Maven-fail-safe plugin extends the sure-fire-plugin.

The difference between the two plugins
The default convention for Surefire is that Tests follow the pattern **/Test*.java,**/*Test.java or **/*TestCase.java
Main goal is “test”

The default convention for Failsafe is that Tests follow pattern **/IT*.java, **/IT*.java or **/*ITCase.java
Main goal is “integration-test”

Right thats the difference between the two plugins sorted. We can use surefire to run our Unit Tests. and failsafe plugin (or launch external Java process e.g. Tomcat) to run our Integration Test

Now how to we get the failSafe plugin (or other Java process) to generate the IT Jacaco file in step 2 of our build?

If you are using fail-safe-plugin to run your Integration Test.
You’ll need to set the “argLine” config of the plugin to something like this

-javaagent:C:\tools\jacoco-agent.jar=destfile=C:\build\myparentprojectpath\target\itjacoco.exec,append=true,includes=com.mypackage.*

If for example you intend to run your integration tests as part of Tomcat, you can set the above argLine as your “CATALINA_OPTS” environment variable.

Note
One thing to bear in mind, the IT jacoco file is intially 0 bytes when but when the failsafe plugin or your java program ends, you should see the jacoco file being populated.

Super, now when your run your Integration Test in Step 2, you will have an produced an single itjacoco.exec file ready for Step 3 of your build

More about Step 3

Because we’ve already run our unit and integration test in phase 2, we want to avoid sonar having to re-run unit tests and integration test if possible, so we set this property in our maven build

-Dsonar.dynamicAnalysis=reuseReports

When sonar tries to work out the integration test coverage for project a, b, and c it needs to know where the global IT jacoco file is. So we need to pass another property to maven for this.

-Dsonar.jacoco.itReportPath=C:\build\myparentprojectpath\target\itjacoco.exec

Now sonar can report integertion test coverage in your mutli-module project.

Using Sonar for your .Net project

Please note: Sonar .net plugins have been rewritten and version 1.0 has been released. Information on this blog relates to version 0.6 of the plugin. More information on the updated plugin can be found here

In my previous post, I covered how to install sonar, followed by how to setup a Java maven project to use sonar. You can also use sonar for your .net project – it’s not quite as straightforward as using it for Java, as you need to have various tools installed on the machine as prerequisites.

Firstly you need to install some plugins on the Sonar server. If your sonar server is running. You’ll need to stop it and then download the sonar .net plugins from the sonar .net plugin site and copy the jar files into you sonar extensions plugin folder.

The machine that will actually run the maven sonar analysis, will need to have a few prerequisites installed.

(1) Install Gallio onto your machine – With Gallio you can run different types of test frameworks, NUnit, MSTest, MBunit etc.. all under the one tool.

(2) Install FXCop 10, unfortunately this a little bit tricky, as only Visual Studio Premium comes shipped with FXCop 10, however, if you download and install the Windows SDK vers 7.1 (warning though, it’s a big download/install), you can install FXCop from the bin folder of the Windows SDK, follow instructions here

(3) Install PartCover 4 and install onto the machine (this allows you to get code coverage stats).

(4) Install source monitor onto your machine

The way sonar-net plugin works, is that it’s a maven plugin, so to build your Visual Studio solution, you actually have to use maven and create a pom.xml for your visual studio solution. So basically you will run maven and it will build your visual studio project for you and generate the sonar metrics for you.

Note if you are using 64 bit OS..

If you are using a 64 bit OS, currently you have to patch PartCover.exe and Gallio.Echo.exe to be 32 bits, otherwise you will not get any code coverage stats. You can patch the binaries using the tool CoreFlags.exe (this is provided in the windows sdk tool).

So open up a command prompt (but you have to open using “Run as Administrator” otherwise you’ll get a message unable to open file if you don’t).

path=C:\Program Files\Microsoft SDKs\Windows\v7.1\Bin;%PATH%
cd "C:\Program Files (x86)\PartCover\PartCover .NET 4.0"
corFlags.exe PartCover.exe /32BIT+ /Force

cd "C:\Program Files (x86)\Gallio\bin"
corFlags.exe Gallio.Echo.exe /32BIT+ /Force

32 bit OS users can ignore the above step.

Here is the DistanceConverter-Net project to use, (again like the Java version, nothing much in it but enough to do a sonar analsysis). Note, this sample project is using NUnit for the unit tests, you will need to have NUnit installed on the machine to run sonar analysis. Unzip that to a directory run the command

mvn clean install -Psonar-dotnet sonar:sonar

If you’re running for the first time, expect it to take a while for the all maven dependencies to be downloaded. If all goes well, your sonar dashboard should be updated

Using sonar in your Java Maven project

In my previous post, I went through how to get sonar up and running, now this guide is a quick how to running sonar for your java maven project.

So here is simple maven project DistanceConverter (hardly anything in this project, but enough to run sonar). If you look at the pom.xml file for this project, you will a sonar profile and some properties required for the sonar plugin. To run the sonar code metrics, you need to run

mvn clean install -Psonar sonar:sonar

The “-Psonar” activates the sonar profile and “sonar:sonar” executes the sonar goal in the sonar plugin. If your running this for the first time, expect a long wait as quite a few dependencies may need to be downloaded.

If all goes well, if you go back to the sonar webpage, you will see it’s been updated. You’ll see various metrics e.g. code coverage, the violations reported by checkstyle, pmd and findbugs.